How to Dump PS2 BIOS from Your PlayStation 2 Console (PCSX2 & AetherSX2)
If you’re setting up PCSX2 on a Windows PC or AetherSX2 on Android, one of the first things you’ll need is a PlayStation 2 BIOS. Many new users search for a PS2 BIOS dump, wondering whether they should download one from the internet or create their own.
The safest and most reliable approach is to dump your PS2 BIOS from your own console, which gives you an authentic BIOS file while staying within legal and ethical boundaries.
Are you searching for a reliable and easy method to dump the PS2 BIOS from your console? This guide is designed to help you. We’ll walk you through the process step by step, covering both modded PlayStation 2 and unmodded PlayStation 2 systems.
In this guide, you’ll learn how to dump a PS2 BIOS, the tools you’ll need, and the exact steps for both modded and unmodded PlayStation 2 consoles. Whether you’re looking for how to dump BIOS for PCSX2, how to dump BIOS for AetherSX2, or simply how do I dump my PS2 BIOS, this guide covers everything in an easy-to-follow format.
If you want to play PS2 games on emulators like PCSX2 (PC) or AetherSX2 (Android), having your own dumped BIOS file is absolutely essential for accuracy, compatibility, and smooth performance. Follow our step-by-step guidelines to confidently dump your PS2 BIOS and get started with emulation the right way.
Why You Need to Dump PS2 BIOS from Your Own Console
A BIOS (Basic Input/Output System) is firmware stored inside every PlayStation 2. It initializes the hardware and allows games to communicate with the console. Since emulators like PCSX2 and AetherSX2 recreate PS2 hardware in software, they require a genuine BIOS to function correctly.
Creating your own PlayStation 2 BIOS dump is the recommended method because it provides an authentic BIOS dump file taken directly from your console.
Dumping the BIOS from your own PlayStation 2 isn’t just a technical step; it is the right way to get the best emulation experience while staying safe and responsible. Here’s why it matters:
Stay Legally Safe
One of the biggest reasons to dump PS2 BIOS yourself is legality.
The PS2 BIOS is copyrighted software owned by Sony. While creating a personal backup from a console you own is generally considered different from downloading someone else’s copy, distributing or downloading BIOS files from unofficial sources may violate copyright laws depending on your country.
If someone asks how to dump your PS2 BIOS, the answer is simple:
- Use a console you personally own.
- Create your own BIOS dump.
- Keep it for personal use.
This approach is much safer than searching for a random PS2 BIOS dump download online.
Get Accurate Emulation
Every PS2 model contains official firmware designed specifically for PlayStation 2 hardware.
When you dump BIOS from a PS2 console, you’re using the exact firmware intended for your system. This often provides:
- Better emulator stability
- Fewer startup issues
- More accurate hardware behavior
- Improved compatibility with classic games
Many users searching for how to dump BIOS for PCSX2 do so because they want the most authentic PlayStation 2 experience possible.
Improve Game Compatibility
Different PS2 revisions include different BIOS versions.
Although PCSX2 supports many BIOS revisions, using a genuine BIOS dump from your own console helps avoid unexpected issues such as:
- Black screens
- Boot failures
- Missing audio
- Random crashes
- Save problems
Whether you’re playing action games, RPGs, racing titles, or sports games, an authentic PS2 BIOS dump file generally provides the best compatibility.
Create a Personal Backup
Hardware doesn’t last forever.
A PlayStation 2 console may eventually stop working because of age, damaged components, or optical drive failure.
Creating a BIOS dump today ensures you always have a personal backup for future emulator use.
Think of it as preserving your own hardware rather than relying on unknown files downloaded from the internet.
Requirements for Dumping BIOS File (Modded & Unmodded Consoles)
Before starting the dumping BIOS process, gather everything you’ll need. The requirements vary slightly depending on whether your console is modded.
For a Modded PS2
A modded console makes the process much easier. Here are the compulsory requirements for dumping BIOS from a modded PlayStation 2:
You’ll typically need:
- A PlayStation 2 console
- Free McBoot (FMCB)
- A USB flash drive (FAT32 formatted)
- uLaunchELF
- A trusted BIOS dumper tool
- Enough free storage on the USB drive
- A computer to transfer the BIOS dump afterward
- A USB flash drive (with at least 1GB of free space, and make sure it’s formatted to FAT32)
- A Memory Card with free McBoot (FMCB) or a modchip installed.
- uLaunchELF file manager
- BIOS Dumper Tool for dumping the BIOS file from the console
Many users refer to this utility simply as a PS2 BIOS dumper or PCSX2 BIOS dumper, since the resulting BIOS works perfectly with PCSX2.
For an Unmodded PS2
If your PlayStation 2 hasn’t been modified, you’ll still need:
- Original PlayStation 2 console
- Compatible USB flash drive
- BIOS dumper files
- Appropriate launch method for homebrew software
- Windows PC or Mac for copying files
- PS2 memory card
- USB flash drive(FAT32 formatted)
- BIOS dumper file
- uLaunchELF
- A method to temporarily run unsigned code (e.g., FreeDVDBoot, Swap Magic, disc swap trick, or hardware service)
Although the setup requires additional preparation, it’s still possible to dump BIOS PS2 without permanently modifying your console.
How to Dump PS2 BIOS from a PlayStation 2 Console?
The overall process is straightforward regardless of the console model.
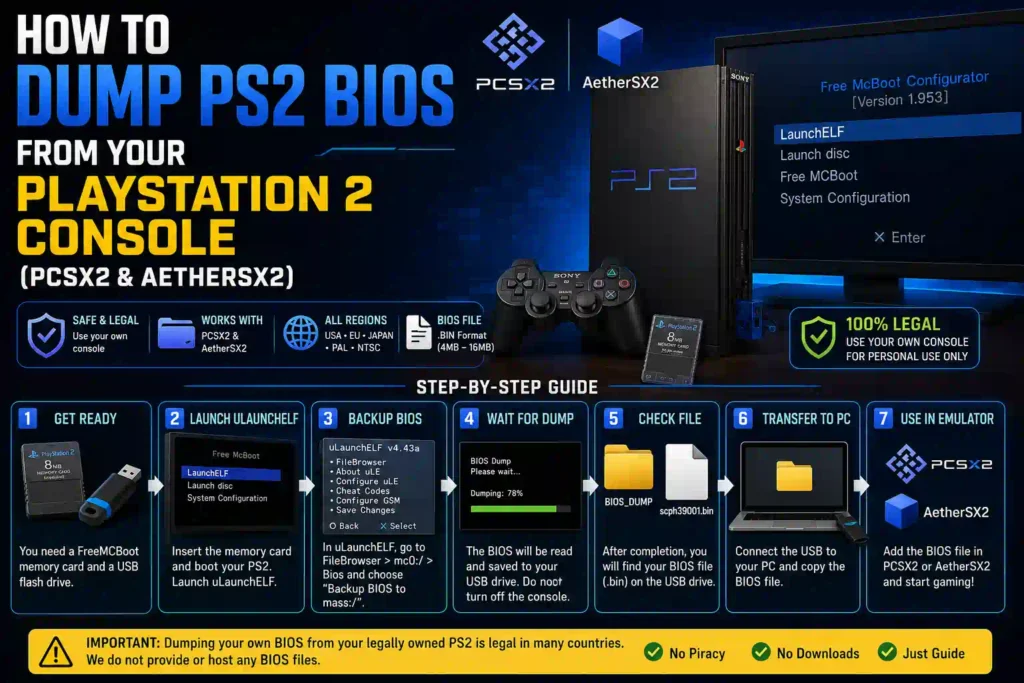
Conceptually, dumping BIOS means making your console capable of running homebrew software, and then using a BIOS dumper utility to read the system’s firmware and copy it onto a USB drive. The way you achieve this depends on whether your console is modded or unmodded.
On a modded PlayStation 2, dumping the BIOS is fairly simple. You can use a Free McBoot memory card to launch uLaunchELF, then run a BIOS dumper tool that reads the BIOS and saves a copy onto your USB drive.
On an unmodded PlayStation 2, things are a bit trickier. You’ll first need a workaround to launch the uLaunchELF file manager. There are several methods to do this, and we’ve explained them step by step in the sections below for your convenience.
You can also download the ps2 bios files from our website which are completely safe and free.
Here’s the basic workflow:
- Prepare the required BIOS dumper files.
- Copy them to a USB drive.
- Launch the dumper on your PlayStation 2.
- Create the BIOS dump.
- Copy the dumped BIOS to your computer.
- Configure PCSX2 or AetherSX2 using your new BIOS.
The exact steps differ slightly for modded and unmodded consoles, which we’ll cover next.
Dumping PS2 BIOS from a Modded PlayStation 2
Using Free McBoot is one of the easiest and most popular methods for creating a PlayStation 2 BIOS dump. It allows you to launch homebrew applications, including a trusted BIOS dumper tool, without modifying the console’s internal firmware.
Step 1. Ensure Free McBoot is Installed
Before you begin, confirm that your memory card already has Free McBoot (FMCB) installed.
When you start the console with the FMCB memory card inserted, you should see the Free McBoot menu instead of the standard PlayStation 2 startup screen.
If FMCB loads successfully, your console is ready for the BIOS dumping process.
Step 2. Download the Required Tools
Next, download the homebrew utilities needed for the dump.
Typically, you’ll need:
- uLaunchELF
- A reliable PS2 BIOS dumper
- The required configuration files
Be sure to obtain these tools from trusted community sources to avoid corrupted or outdated files.
Step 3. Copy the Tools to a USB Drive
Format your USB flash drive as FAT32, then copy the BIOS dumper files and uLaunchELF onto the drive.
Organize the files neatly so they’re easy to locate once you’re inside the PS2 file manager.
Most users place everything in a folder such as:
/BIOS_DUMPER/
This makes navigation much simpler during the next steps.
Step 4. Insert the USB Drive and FMCB Memory Card into the PS2
With the console powered off:
- Insert the Free McBoot memory card.
- Plug the USB flash drive into one of the PlayStation 2’s USB ports.
- Turn on the console.
Once the FMCB menu appears, you’re ready to launch the required applications.
Step 5. Boot into Free McBoot Menu & Run uLaunchELF
After your PlayStation 2 boots into the Free McBoot (FMCB) menu, launch uLaunchELF, a popular homebrew file manager used to access storage devices and run applications on the PS2.
- Select uLaunchELF from the FMCB menu.
- Wait for the application to load.
- Navigate to your USB flash drive (usually listed as mass:).
- Open the folder containing the BIOS dumper tool.
- Highlight the BIOS dumper executable and press ✕ (Cross) to launch it.
The BIOS dumper will initialize and prepare to read the firmware directly from your PlayStation 2. Since the BIOS is stored in the console’s ROM chip, the tool safely creates a copy without modifying or deleting the original firmware.
Tip: Don’t remove the USB drive or turn off the console while the BIOS dumper is running. Interrupting the process may result in an incomplete BIOS dump file.
Step 6. Verify Your Dumped BIOS
Once the dumping process finishes, the tool will save several files to your USB drive.
A typical PS2 BIOS dump may include:
- BIOS ROM file
- ROM1
- ROM2 (on some models)
- EROM
- NVM configuration file
The exact files vary depending on your PlayStation 2 model and BIOS version.
To verify the dump:
- Power off the PlayStation 2.
- Remove the USB drive.
- Connect it to your computer.
- Open the USB folder and confirm that the BIOS files were created successfully.
- Ensure the files have reasonable sizes and are not empty.
If the files are present and readable, you’ve successfully completed the PlayStation 2 BIOS dump process.
Many users searching for how to dump BIOS from PS2 to PC stop at this stage because the BIOS is now ready to be transferred and used with an emulator.
Dumping PS2 BIOS from an Unmodded PS2
Although a modded console offers the easiest workflow, it’s also possible to create a PS2 BIOS dump on an unmodded console using supported homebrew launch methods. The exact approach depends on your PS2 model and available hardware, but the overall process remains similar.
Step 1. Copy the Required Tools to a USB Drive
Begin by preparing a USB flash drive.
- Format it as FAT32.
- Copy the required BIOS dumper files.
- Include uLaunchELF if your launch method requires it.
- Safely eject the USB drive.
Using a reliable BIOS dumper tool helps ensure that your firmware is copied correctly.
Step 2. Launch uLaunchELF File Manager
Use your preferred homebrew entry point to start uLaunchELF.
Once it opens:
- Access the USB drive.
- Locate the BIOS dumper application.
- Select the executable file.
The file manager provides access to the tools needed to dump the BIOS without changing the original firmware stored in your console.
Step 3. Run the BIOS Dumper
Launch the BIOS dumper application.
The software will detect your PlayStation 2 hardware and begin reading the system firmware.
During this stage:
- Do not power off the console.
- Avoid pressing unnecessary buttons.
- Wait patiently until the progress indicator reaches 100%.
Creating the dump usually takes only a few minutes.
Step 4. Dump the BIOS to USB
After reading the firmware, the BIOS dumper automatically writes the files to your USB flash drive.
Depending on your console revision, several firmware files may be generated.
These files together represent your authentic PS2 BIOS dump file, which can later be used with compatible emulators like PCSX2 and AetherSX2.
Step 5. Move the BIOS File to Your PC
Once the dump is complete:
- Turn off the PlayStation 2.
- Remove the USB drive.
- Connect it to your computer.
- Copy the BIOS files into a secure folder.
- Keep a backup in another location, such as an external drive.
Having multiple backups protects your firmware if your USB drive becomes damaged or lost.
Common Problems During BIOS Dumping
Although the process is generally straightforward, you may encounter a few issues:
| Problem | Possible Solution |
| USB drive isn’t detected | Reformat it as FAT32 and reconnect it. |
| BIOS dumper won’t start | Verify that all required files were copied correctly. |
| Empty BIOS dump file | Repeat the dumping process without interrupting it. |
| uLaunchELF cannot see the USB | Try another USB drive, preferably USB 2.0. |
| Emulator doesn’t recognize the BIOS | Confirm that every dumped file was copied correctly and wasn’t renamed. |
These simple checks solve most issues users face when learning how to dump a BIOS from a PS2.
How to Use the Dumped BIOS with an Emulator (PCSX2 or AetherSX2)
After successfully creating your PS2 BIOS dump, the next step is configuring your emulator. Both PCSX2 (Windows, Linux, and macOS) and AetherSX2 (Android) require a valid BIOS before they can boot PlayStation 2 games.
If you’ve been searching for how to dump BIOS for PCSX2, how to dump BIOS for AetherSX2, or how to dump PS2 BIOS into PCSX2, this section will walk you through the setup process.
Important: Only use the BIOS files you dumped from your own PlayStation 2 console. This ensures you’re using authentic firmware and helps avoid compatibility issues.
For PCSX2 (PC)
PCSX2 automatically detects compatible BIOS files when they’re placed in the correct location or selected during the initial setup.
Step 1. Transfer the BIOS Files
Connect your USB drive to your computer and copy the dumped BIOS files into a dedicated folder.
For example:
Documents/
└── PS2 BIOS/
├── SCPHxxxxx.bin
├── ROM1
├── ROM2
├── EROM
└── NVM
Keeping the original filenames intact makes it easier for PCSX2 to recognize the firmware.
Step 2. Install or Open PCSX2
Launch the latest version of PCSX2.
If it’s your first time opening the emulator, the setup wizard will ask you to choose a BIOS directory.
If you’ve already completed the initial setup:
- Open Settings
- Navigate to BIOS
- Browse to the folder containing your dumped BIOS
PCSX2 will scan the folder and list all compatible BIOS versions it finds.
Step 3. Select Your BIOS
Choose the BIOS that matches your console.
After selecting it:
- Save your settings.
- Restart PCSX2 if necessary.
- Load your PS2 game ISO.
If everything was configured correctly, the emulator should boot just like a real PlayStation 2.
Many users who search for PCSX2 dump BIOS, PCSX2 BIOS dumper, or how to dump BIOS for PCSX2 are simply trying to complete this final configuration step.
Step 4. Test Your BIOS
Before playing your favorite games:
- Boot the PS2 system menu.
- Confirm the BIOS version displays correctly.
- Launch a game.
- Verify that memory cards and controllers work as expected.
If the emulator starts normally, your PlayStation 2 BIOS dump is working correctly.
For AetherSX2 (Android)
The setup process on Android is very similar.
Step 1. Copy the BIOS to Your Phone
Transfer the BIOS folder from your computer to your Android device.
You can use:
- USB cable
- SD card
- Cloud storage
- Local file transfer apps
Store the BIOS somewhere easy to access.
Step 2. Open AetherSX2
Launch AetherSX2.
During the first-time setup, the emulator will ask you to select a BIOS file.
Tap Import BIOS or browse manually to your BIOS folder.
Step 3. Select the Dumped BIOS
Choose the BIOS you dumped from your own console.
Once imported, AetherSX2 will verify the firmware.
If recognized successfully, the emulator is ready to run PlayStation 2 games.
Step 4. Load Your Game
After importing the BIOS:
- Add your legally owned PS2 game ISO.
- Configure graphics and controller settings.
- Start the game.
With a proper PS2 BIOS dump, many games will run much more reliably than with unofficial or incomplete BIOS files.
Tips for a Safe and Successful BIOS Dump
Dumping a BIOS is usually a one-time process, so it’s worth taking a few extra precautions to ensure everything goes smoothly.
Use a Reliable USB Drive
A faulty USB drive can lead to incomplete or corrupted BIOS files. Use a quality USB flash drive formatted as FAT32, and make sure it has enough free space before starting.
Keep the Console Powered On
Never switch off your PlayStation 2 or remove the USB drive while the BIOS dumper is working. Interrupting the process can result in an unusable BIOS dump file.
Verify the Files
After copying the BIOS to your computer:
- Check that all expected files are present.
- Confirm none of the files are empty.
- Keep the original filenames unchanged.
Back Up Your BIOS
Create at least two copies of your dumped BIOS:
- One on your computer.
- Another on an external drive or secure cloud storage.
Having a backup protects you if your primary copy is accidentally deleted.
Download Homebrew Tools from Trusted Sources
Whether you’re using uLaunchELF, a BIOS dumper, or another homebrew utility, always download them from reputable PlayStation 2 homebrew communities. Avoid modified or unknown versions that could be outdated or unreliable.
Keep Your Emulator Updated
New versions of PCSX2 and AetherSX2 often improve compatibility, performance, and BIOS detection. Updating your emulator can help you get the best experience from the BIOS you’ve dumped.
Legal Note
Dumping your own PlayStation 2 BIOS is an important step in setting up emulators like PCSX2 and AetherSX2. However, it’s equally important to understand the legal responsibilities that come with using BIOS files.
The PlayStation 2 BIOS is copyrighted firmware developed by Sony. While many retro gaming enthusiasts create a personal PS2 BIOS dump from their own console, downloading or distributing copyrighted BIOS files without permission may violate copyright laws in your jurisdiction.
Always check the laws that apply in your country and use emulation software responsibly.
Only Use the BIOS You Dump from Your Own Console
The safest and most responsible approach is to use a BIOS created from a PlayStation 2 that you personally own.
By creating your own PlayStation 2 BIOS dump, you can:
- Use authentic firmware with compatible emulators.
- Improve game compatibility and stability.
- Maintain a personal backup of your console’s firmware.
- Avoid relying on unknown BIOS files from unofficial sources.
If you’re wondering how to dump your PS2 BIOS, how to dump BIOS from a PS2 console, or how to dump BIOS for PCSX2, following the steps in this guide allows you to create your own BIOS for personal use.
Don’t Share with Others
Although you’ve created your own BIOS backup, it should remain for your personal use only.
Avoid:
- Uploading BIOS files to file-sharing websites.
- Sending your BIOS to friends or other users.
- Including BIOS files in emulator packages.
- Sharing download links on forums or social media.
PCSX2 and AetherSX2 are designed to work with a BIOS that you legally obtain yourself. Keeping your BIOS private helps respect intellectual property and supports responsible emulation practices.
Conclusion
Creating your own PS2 BIOS dump is the most reliable way to prepare your PlayStation 2 games for emulation while using authentic firmware from your own console. Whether you’re setting up PCSX2 on a Windows PC or AetherSX2 on an Android device, a properly dumped BIOS provides better compatibility, improved stability, and a more accurate PlayStation 2 experience.
Throughout this guide, you’ve learned how to dump PS2 BIOS, the tools required for both modded and unmodded consoles, how to transfer the BIOS to your computer, and how to configure it with your preferred emulator. By following these steps carefully, you can preserve your console’s firmware and enjoy your legally owned games with confidence.
Remember to keep your BIOS files backed up, use them only for personal purposes, and avoid downloading or sharing copyrighted BIOS files. Responsible emulation helps preserve classic PlayStation 2 gaming while respecting the rights of the original creators.
With your BIOS safely dumped and configured, you’re ready to experience thousands of iconic PS2 titles on modern hardware with the enhanced features offered by today’s leading emulators.
FAQs | Dumping Ps2 BIOS for PCSX2 and AetherSX2
What is a PS2 BIOS dump?
A PS2 BIOS dump is a copy of the firmware stored inside your PlayStation 2 console.
It allows emulators such as PCSX2 and AetherSX2 to initialize and emulate the console’s hardware accurately.